
Ether Dream - User Guide
NOTE - This page is for the original Ether Dream 1. Check the current website.
Contents
Introduction
Congratulations! Ether Dream is the most flexible, powerful, and open DAC available today. It is designed to enable easy live playback from PC software and to serve as a platform for experimentation and development.
Quick Start
To get started with your Ether Dream, just connect its output to your projector, its Ethernet connection to your network or computer, and then the power supply to a source of 9-25v DC or to the included adapter. The green LED next to the USB connector will light to indicate that power is on, and the yellow LED next to the ILDA connector will light to indicate that the interlock is now closed.
If you're connecting to a home network with a router or DHCP server, no other configuration will be needed - any computer on the network will be able to reach the Ether Dream. If you connect the Ether Dream directly to your computer, make sure that it is set to obtain its IP address automatically.
To make sure that your computer can communicate properly with your Ether Dream, a diagnostic tool is available on the Downloads page.
Note: you may need to disable or adjust the settings on your firewall software to be able to communicate with the Ether Dream. The driver DLL uses TCP port 7765 and UDP port 7654.
LSX, ILD SÔS, and other software using the universal DAC interface library written by drlava have native Ether Dream support. However, a software update may be needed - support was only added to the library in late October 2011. Contact drlava for an updated build of LSX or ILD SÔS. Other software that works with ezauddac.dll can be set up to use an Ether Dream by making a backup of its ezauddac.dll and renaming EtherDream.dll (from the Downloads page) to ezauddac.dll.
Once the driver DLL is installed, just start up the software and the Ether Dream will automatically be detected.
Hardware
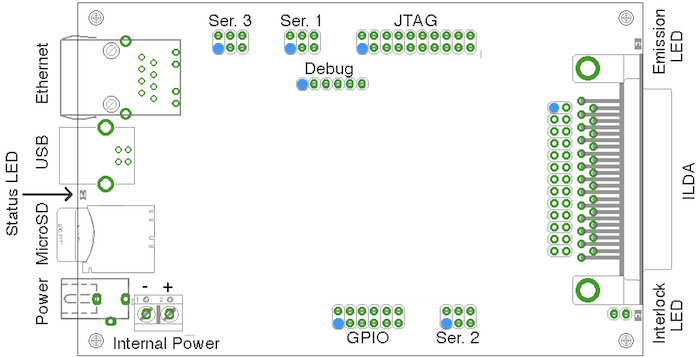
Starting at the Ethernet connector on the board and moving counterclockwise, the indicators and connectors on the board are:
- Ethernet connector - includes link and activity LEDs.
- USB connector. This is currently used only for firmware upgrades.
- Status LED. This LED blinks when the board is in bootloader mode, and is on normally.
- MicroSD slot. This is used for configuration and for playback of stored content.
- External power jack. This is a 2.1mm/5.5mm barrel connector, center-positive, accepting 8V-25V DC at 300mA.
- Power supply screw terminals. Ground is on the left (towards the outside of the board), positive is on the right (towards the inside of the board). The two power inputs are isolated from one another with diodes; if both are connected, power will be drawn only from the one with the higher voltage.
- GPIO header. This connects extra pins from the microcontroller.
- Serial header for future expansion (#2).
- Interlock LED (yellow). This LED is on whenever the interlock relay is closed.
- ILDA DB-25 connector.
- Behind the DB-25 connector: 2x13 pin header wired identically to the DB-25. This can be used when the Ether Dream is built into a projector.
- Emission LED (green). Whenever the DAC is producing output, this LED is on.
- 2x10-pin programming/debug header (JTAG).
- 1x6 pin programming/debug header (serial).
- Serial header for future expansion (#1).
- Serial header for future expansion (#3).
Live Playback
Ether Dream supports a standard frame-based API and should work "out of the box" with existing playback software, once drivers are installed.
In the event of a momentary glitch in its data stream, the Ether Dream driver will automatically restart playback. If an Ether Dream unit detects that its network link is physically disconnected, it will go into an 'emergency-stop' mode and stop output until the network is restored.
DMX
With an extra adapter board, the expansion connectors on the Ether Dream can transmit and receive DMX signals to interface with lighting equipment. The Ether Dream can simultaneously drive three DMX universes, relaying commands from Ethernet to DMX, and also receive on one universe, sending information from DMX to Ethernet.
Each of the serial expansion headers on the diagram above can connect to a DMX adapter board. The firmware supports both transmitting and receiving DMX from connector #1, and transmitting only from conectors #2 and #3.
DMX output is enabled and controlled with OSC messages. When the Ether Dream receives a message for a given DMX universe, it will enable output for that universe and start continuously sending DMX data to an attached interface board. The DMX output can be controlled in any of several ways:
/dmxn/channelUpdate one or more channels. For example, to set DMX channel 42 on universe 1 to 200, send an OSC message to
/dmx1/42containing the number 200. If multiple values are sent, they will be assigned to sequential DMX channels: for instance, sending 200, 250 to/dmx1/10will set channel 10 to 200 and channel 11 to 250. One OSC message can change up to 50 channels. The rest of the channels in the universe will not be changed./dmxn channelAlternately, the first channel to update can be sent as a numerical parameter, instead of in the target path of the OSC message. Send 7, 100, 100 to
/dmx2to set channels 7 and 8 of universe 2 both to 100. As above, up to 50 channels can be specified, and only the specified channels will be changed./dmxnTo change all 512 channels in a universe with a single OSC command, the Ether Dream will accept an OSC blob (data) parameter. The first byte (index 0) in the blob sets DMX channel 0, the next sets channel 1, and so on. The blob must be the only parameter and must be exactly 512 bytes long.
DMX input is enabled by sending a message with a string and a number to /dmx1/input. The
string specifies the IP address (must be a numeric IP address, not a hostname) to relay DMX updates to,
and the number is a port number. DMX updates will be sent as OSC messages to /dmx1 containing
a single blob - the same format as described above for DMX output.
If the address given is "me" and the port is 0, then messages will be sent back to the same
host and port that the /dmx1/input command was received one. If the address is blank and
the port is 0, then DMX input will be disabled.
This code will set the first four channels of an Ether Dream's DMX universe 1 to 255:
import liblo
liblo.send(liblo.Address("192.168.1.11", 60000), "/dmx1/1", 255, 255, 255, 255)
To receive input over DMX, raw sockets can be used easily:
sock = socket.socket(socket.AF_INET, socket.SOCK_DGRAM)
sock.sendto("/dmx1/input\x00,si\x00me\x00\x00\x00\x00\x00\x00", ("192.168.1.11", 60000))
while True:
        data, addr = sock.recvfrom(1024)
        print "DMX channels: %d %d %d %d" % map(ord, data[16:20]))
Or liblo's server functionality can be used instead:
import liblo
class DMXServer(liblo.Server):
        @liblo.make_method('/dmx1', 'b')
        def dmx1_callback(self, channel_blob):
                chanenls = map(ord, channel_blob)
                print "DMX channels: %d %d %d %d" % channels[:4]
server = DMXServer(32123)
liblo.send(liblo.Address("192.168.1.11", 60000), "/dmx1/input", "me", 32123)
while True:
        server.recv(100)
Parameters
The other capabilites of the Ether Dream are accessed via its parameters. Parameters can be set and actions invoked in two ways:
- The DAC listens for OSC packets on a UDP port.
- On startup, commands are loaded from the
autoplay.txton the SD card, if present.
OSC is a simple UDP-based protocol for
sending control messages; it is usually used for audio, to control synthesizers, mixers,
etc., but is flexible enough to support laser applications as well. Bridges exist
between OSC and MIDI or DMX. An OSC message is sent to an address, like
/channel/1/volume or /ilda/pps, and contains some data:
zero or more numbers, strings, True/False values, etc.
The Ether Dream listens for OSC messages on UDP port 60000. When it sends a response to a message, it will send that response to port 60001 on the originating host. There are many OSC-handling programs and OSC plugins, as well as libraries for most programming languages, available on the Internet.
Most of the OSC parameter endpoints implemented on the Ether Dream take some sort of data. Those labeled as "integer" or "float" expect a value in the given range. OSC endpoints specified as "message" can be sent a message with either no data or with an integer value, but will ignore the message if the value is zero. This allows them to be controlled by a pushbutton on a control surface that sends OSC messages - a pushbutton will send a nonzero value when it is pressed, and then send 0 when it is released.
/ilda/playfilename - stringWriting a string to this address causes the DAC to switch to file playback mode and begin playing filename from the SD card.
NOTE: Playing a file by name can currently only be done via autoplay.txt, not via OSC.
/ilda/n/play- messageAs
/ilda/playfilename, but plays the nth file found on the SD card. Works over OSC./ilda/fpsfps - integerSwitch to file playback mode and set the frame rate limit to fps.
/ilda/ppspps - integerSwitch to file playback mode and set the point rate to pps.
/ilda/repeatvalue - integerSwitch to file playback mode. If value is nonzero, then files played will be repeated until a stop command is received; if zero, playback stops at the end of a file.
/stop- messageStop playing the current file.
/geom/tl,/geom/tr,/geom/bl,/geom/brx y - float, range [-1, 1]Set the position of a corner of the image within the overall projection field. Values range from -1 to 1. This can apply any arbitrary perspective transform to the input image.
The output bottom left is (-1, -1); the output top right is (1, 1). For example, to leave the image unchanged, set the values as:
/geom/tl-1 1/geom/tr1 1/geom/bl-1 -1/geom/br1 -1
/geom/sizesize,/geom/offsetoffset-x offset-yThese parameters provide a shortcut to setting per-corner positions when only size and position adjustments are needed. To set the image at 50% size and in the top right corner of the projection field, set:
/geom/size0.5/geom/offset0.5 0.5
/geom/rdelay,/geom/gdelay,/geom/bdelaypoints - integer, 0 to 15Set the delay on the red, green, or blue color channel to points points.
As an example, the following autoplay.txt file might be used to play a prerecorded show
automatically when the DAC is powered up:
/ilda/pps 30000
/ilda/fps 30
/geom/size 0.3
/geom/offset 0.4 -0.2
/ilda/play show.ild
The following Python code, using liblo, will play the first ILDA file on the SD card:
import liblo
dac = liblo.Address("192.168.1.107", 60000)
liblo.send(dac, "/ilda/1/play")
Control layout files for TouchOSC, a third-party iPhone/iPad app, are available
in the Ether Dream source repository under the tools/ directory - j4cDAC.touchosc is for iPad, and
j4cDAC-phone.touchosc is for iPhone.